Page 2 of 3 FirstFirst 123 LastLast
Results 11 to 20 of 22

Thread: My Notch Build Tons Of Pics

  1. #11
    Senior Member BUSTED's Avatar
    Join Date
    May 2008
    Location
    Arizona
    Posts
    272
    Ok here you go.

    John and I actually put it on yesterday after work. We only spent 5 minutes adjusting it because the paint shop will be removing the hood when I drop it off.

    The headlights were also changed to the 3pc Euro Clear set.

    Name:  IMG_0049.jpg
Views: 460
Size:  43.3 KB

  2. #12
    Senior Member svtrichie's Avatar
    Join Date
    Sep 2007
    Location
    Phoenix, Arizona
    Posts
    538
    the hood looks nice on it.

  3. #13
    Senior Member BUSTED's Avatar
    Join Date
    May 2008
    Location
    Arizona
    Posts
    272
    Old Brakes VS New Alcon Brakes.


    Name:  SSPX0161.jpg
Views: 422
Size:  43.4 KB

    Name:  IMG_1497.jpg
Views: 422
Size:  55.3 KB

    Name:  Alcon Brakes.jpg
Views: 425
Size:  61.5 KB

  4. #14
    Senior Member BUSTED's Avatar
    Join Date
    May 2008
    Location
    Arizona
    Posts
    272
    Over time the steering rack seals went. So I ordered up a quick ratio one to keep the oil off the garage floor.

    Luckily I also had a new Baer bumpsteer kit hanging on the garage wall from my last notchback that I never did finish.

    Also to do the 5 lug front conversion I purchased a set of 1994-95 front spindles and SN95 ball joints which were needed too. You can use V6/GT/Cobra spindles they are all the same.

    Name:  SSPX0414.jpg
Views: 417
Size:  37.7 KB

    Name:  SSPX0415.jpg
Views: 412
Size:  44.5 KB

  5. #15
    Junior Member Chris's Avatar
    Join Date
    Jan 2009
    Location
    phoenix-Arcadia
    Posts
    22
    The hood looks nice on the Fox!

  6. #16
    Super Moderator 4Jenna's Avatar
    Join Date
    Apr 2007
    Location
    AZ
    Posts
    1,939
    Platinum Award 
    Coming along nice, going to be a fun car!

    -Chris
    JENNABEARS Foundation
    www.jennabearsfoundation.org

  7. #17
    Senior Member BUSTED's Avatar
    Join Date
    May 2008
    Location
    Arizona
    Posts
    272
    Thanks guys


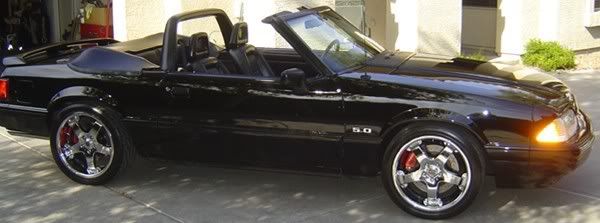
    I had a set of old Roush 18X9 wheels that had seen better days. So I sent them out to powdercoat and purchased (4) new 255/40-18 Goodyear Eagle F1 GS Fioranos.

    I plan to have the centercaps painted white with the car.

    Out with the 15" phone dials.


    Name:  IMG_1509.jpg
Views: 402
Size:  58.2 KB

    Name:  100_2427.jpg
Views: 398
Size:  49.1 KB

    Name:  100_2432.jpg
Views: 411
Size:  65.8 KB

  8. #18
    Senior Member BOOMSHAKALAKA's Avatar
    Join Date
    Oct 2008
    Location
    Gilbert, AZ
    Posts
    197
    Me Gusta!
    2001 GT Performance Red

  9. #19
    Senior Member BUSTED's Avatar
    Join Date
    May 2008
    Location
    Arizona
    Posts
    272
    Just wanted to thank Jared for helping me with the rear brakes after work last week. I hardly got a wrench on em' lol.

    Havin' the 13" rears on made a HUGE change in the way the car stops. It feels like the car could out brake a shifter cart

    I also had to change the master cylinder to a 94-95 Cobra style, install a Baer prop. valve on he passenger side of the firewall, and change 4 hard lines out from the master cylinder. I purchased the whole master cylinder conversion kit from Baer locally and I have to say not one part caused an issue and the install instructions made life easy.

    Name:  100_2394.jpg
Views: 373
Size:  52.7 KB

    Name:  100_2415.jpg
Views: 370
Size:  54.8 KB

    Name:  100_2397.jpg
Views: 374
Size:  71.7 KB

    Name:  100_2411.jpg
Views: 353
Size:  46.7 KB

    Name:  100_2433.jpg
Views: 372
Size:  39.0 KB

  10. #20
    Senior Member BUSTED's Avatar
    Join Date
    May 2008
    Location
    Arizona
    Posts
    272
    Here are the wheels installed. They are all 18x9s w/ a +24MM offset . With the added 1" width of the 96-98 8.8 rear you can see the tires are flush with the quarter panels (this is why most don't use these rears). I dig the way it looks but will need to go get an Eastwood fender rolling tool as it rubs if you hit a big bump. Name:  IMG_0102.jpg
Views: 345
Size:  42.5 KB

    Name:  IMG_0110.jpg
Views: 359
Size:  41.0 KB

    Name:  IMG_0124.jpg
Views: 360
Size:  43.5 KB

    Name:  100_2435.jpg
Views: 363
Size:  45.8 KB

    Name:  IMG_0130.jpg
Views: 382
Size:  48.5 KB

    Name:  IMG_0132.jpg
Views: 360
Size:  42.5 KB

    Name:  IMG_0094.jpg
Views: 359
Size:  36.5 KB

Posting Permissions

  • You may not post new threads
  • You may not post replies
  • You may not post attachments
  • You may not edit your posts
  •