

 Mustang Feeds
Well I came up with the The number of turns head thread Test.
Basically there is a seat in the head for the wider portion of the plugs just above the threads to stop on. This seat, notch, ledge, whatever... read more
I have this setup and it works great.
http://www.joelynch.org/cobrasite/Jo...line-lock.html
Installing Line Lock
These notes apply specifically to a 99 Cobra with ABS. A Mustang GT and other new cars, at least through the 2001 model year, are very similar. I have added some notes from people who used the initial version of this page for their install.
You will need the following items and tools....
- Hurst Roll Control Kit Part Number 174 5000, Includes the solenoid, pushbutton, light, instructions
- Hurst Roll Control Adapter Fitting Kit Part Number 567 1516, Includes fittings to adapt 3/16" fittings to metric
- Hurst Installation Kit Part Number 567 1510, Includes some tubing, fittings, and plugs, no metric
- One Additional 12" long 3/16" brake line
- One 1/4"x 3/4" bolt, nut, flat washer, lock washer
- Velcro adhesive strips--3" total length
- ground lugs
- 4amp in-line fuse
- 16 gauge wire
- two 3/16" x 12" brake lines
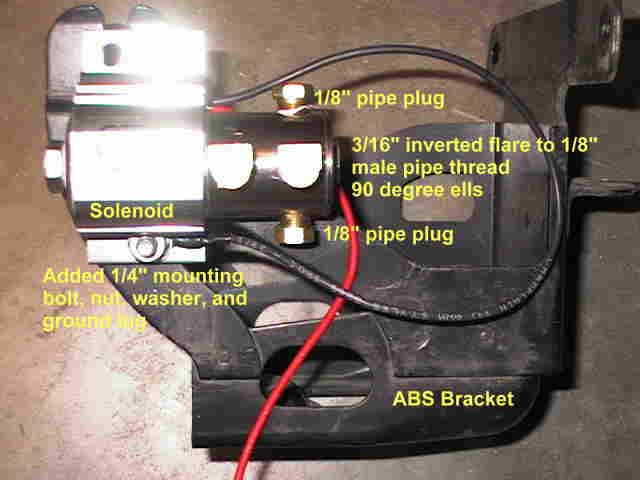
- two 1/8" pipe thread plugs for the unused ports on the solenoid
- two 1/8" pipe thread male 90 degree angle fittings with 3/16" female inverted flare to connect the tubing to the solenoid ports
- Tape
- Solder
- Soldering iron
- 5/16" drill bit
- 1/4" drill bit
- Electric drill
- The following open-ended wrenches:
- 3/8 inch
- 1/2 inch
- 7/16 inch
- 10 mm
- 12 mm
- 13 mm
- 14 mm
- 10 mm socket
- 6" extension
- Ratchet
- Brake bleeder
- Brake fluid
- The hot wire can be tied into the same connection as the power to the Abbott unit, using a hot wire in the console just to the left of the shifter.
- I used a two-sided Velcro strip, one side on the side of the switch, the other just to the left of the CD player, and installed the switch there.
- In this location, the switch can be operated with your index finger with the shift lever in first gear position.
- The indicator light can be placed on the top of the dash using another small piece of two-sided Velcro.
- The light can be seen staging in either lane.
- The wires are run easily into the console through the top of the shifter boot.
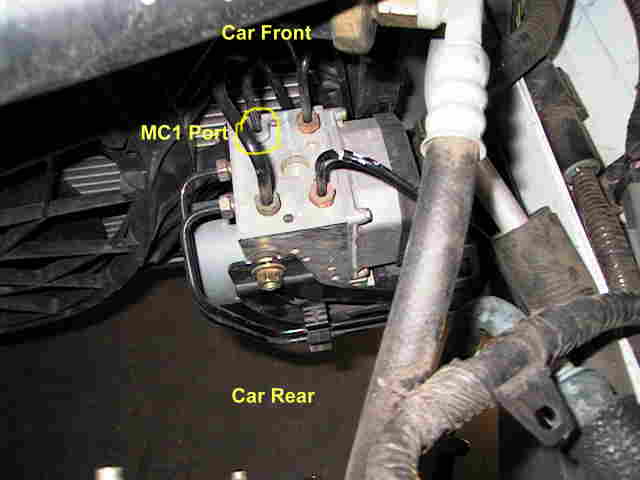
- The hot wire can be run through the air conditioner drain hole in the firewall and routed up on the left side of the engine compartment to the ABS module.
- Mount the solenoid on the rear of the ABS module bracket using the rear mount bolt and adding one bolt.
- Two bolts are needed to hold the solenoid securely.
- Drill one hole in the solenoid mount to 5/16" so that it will fit over the stud.
- Use two 5/16" washers to space it out so that it fits the bracket contour.
- Remove the bracket from the car to drill one 1/4" hole for the lower mounting bolt.
- Reinstall the bracket.
- Mount the solenoid. (The brake lines are in the way if you try to put the bracket back on with the solenoid mounted.)
- Put a ground lug on the solenoid ground wire under the 1/4" solenoid mounting bolt.
Here is the bracket removed from the car and drilled for the solenoid mount:
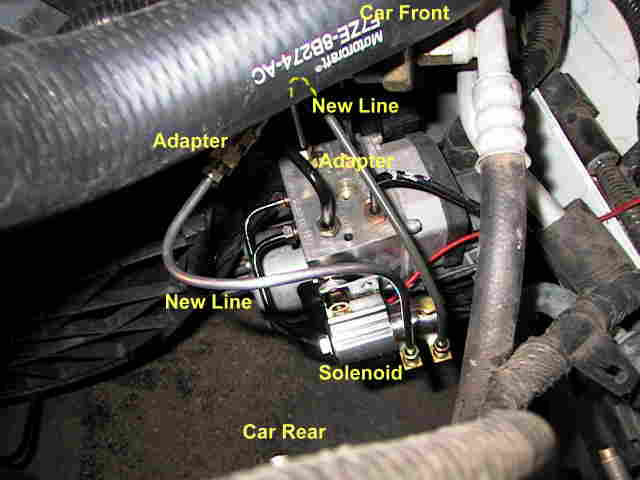
Here is the finished solenoid installation:
You have to bleed the brakes after installing the line-lock.
How it works:
The line-lock is nothing but a solenoid valve in the front brake lines which is
energized (closes) on pressing the switch near the shifter.
It is used at the line and in the water box. At the line, you can stage, apply the brake,
push the button, let off the brake, and the front brakes are held on until the button is
released. This allows you to let out the clutch some without accidentally rolling the car
forward. Release the button at the same time you release the clutch to launch
the car.
In the water box, you can hold the car in the box using the front brakes only, after
positioning the car, pushing the brake pedal, pushing the switch, release the foot
brake, spin the tires to your heart's content; as you release the button, the car will move out of the
box and lurches as it hits drier pavement. During normal driving, the solenoid is open and the brake pressure is applied to the ABS
unit exactly as it is without the solenoid installed. Only when the solenoid is powered
via the dash button is the brake line valved off and pressure held on the front brakes.